
The Story of a Kit Car Build
Carpet and Trim
When it came time for the trimming, it was just a matter of cutting cards for the doors and foot well sides, then covering the door cards with a thin layer of sponge before doing everything with vinyl. I cut holes for the courtesy lights before final trimming and at the rear it needed holes for the hood frame fittings – but I’ve not fitted those yet as I’ve still got SVA to think of and they may have sharp edges. I used Velcro for attaching the cards in some places. The foot well cards had one edge left with enough vinyl to fix under the edge trim on the door opening, so that was OK, but I didn’t want to use screws anywhere, so that’s where the Velcro came in. On the door cards themselves, I’d glued some countersunk screws then covered the card and then fixed them with washers and wing nuts through the hole in the middle, as the original cars had. It’s a bit more cockpit storage as well.
The only templates I made for the carpets were for the bulkhead and the transmission tunnel. The rest I just fitted and trimmed while in place, a bit like hanging wallpaper; just cut the pieces to approx size, spray the glue, stick it in place and trim the edges. I suppose it helps a bit if you’re a decorator!
I thought I’d have to have the tunnel carpet edge trimmed because it was such an awkward shape, but used double edged carpet tape instead. So with a butt edged joint in the right place and the seats in place, you can’t see the joint unless someone points it out to you. The tunnel and front and rear bulkheads were soundproofed with underlay, but I left the floor itself so that WHEN(!) it gets wet it won’t soak up too much water – and the carpet pieces are easy to remove again by being kept in place with Velcro. I’m also having some floor mats made with bound edges and heel pads. Notice that I said WHEN, not IF, as I’m sure there can’t be many convertible cars, kit or otherwise, that are completely waterproof. Please correct me if I’m wrong there and tell me how you did it!
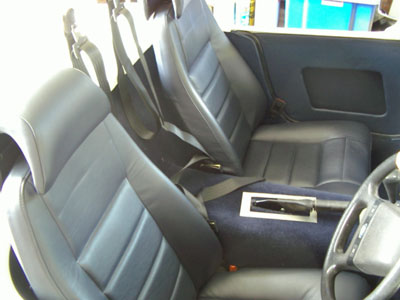
I had to fit the seat belts before the seats went in as I couldn’t get to the bolts after they were in place. Because I can’t fit inertia belts due to lack of room, I’ve had to go for the static ones. And due to regs regarding fitment, I’ve had to fit them in opposite places so the driver (me) has to have the shoulder strap over my left shoulder instead of right, and passenger vice versa.
The seats went straight in to complete the cockpit area. That’s that sorted.
The boot was a bit harder to carpet due to the various shapes under the lid but it looks OK – especially when the lid’s shut!
Interior, seats, etc.
-
Part I – July 2005
-
-
Part II – November 2006
-
Part III – January 2009